API concepts, authentication, webhooks, examples and more
Get started
The Billecta API was created to enable partners to integrate their systems directly into Billecta.
To integrate with Billecta you need to start with a test account. A test account is free. Within the test environment you can
perform all operations without the concern of your customers getting any test invoice. Please note that the credentials for the
test environment logon will not work in the production environment and vice versa.
If you have any questions regarding our API or the integration itself you are welcome to contact us by either sending an email
or calling our support. Logs of all requests and possible errors are stored and we're happy to assist with reviewing and troubleshooting.
Once the integration is built and the testing is done you are ready to move to the production environment. Contact Billecta
support for planning and creating an account in the production environment.
The following environments are available for integrations.
Environment
API
Portal
Production
https://api.billecta.com
https://app.billecta.com
Testing
https://apitest.billecta.com
https://apptest.billecta.com
Differences between Production and Testing environments
We use weaker machines and databases compared to the production environment. Performance is not the same. If you want to perform performance tests in a production-like environment, please contact us
We release to test without any warning. The environment can sometimes be unresponsive for a few seconds. Releases are made on average every second day
We might release not fully tested code. We do try to test it as much as possible before releasing it to test. If you encounter unexplained errors that you are sure are not caused by any change on your side, please contact us
No charging is made for using test. It is completely free
No mail is sent to the postal offices at all
E-mails and SMS are only sent to whitelisted receivers. Please contact us to add emails/phone numbers to the whitelist
The test environment is restored from production and cleaned from sensitive data from time to time.
TLS/SSL
All connections to the API must be in the HTTPS protocol with TLS 1.2 or above.
Throttling
By default, Billecta API imposes a rate limit on incorrect API calls. Users are allowed to make up to 50 incorrect calls (response codes ranging from 400 and above except 404) within a 60-second window. If a user exceeds this limit, they will encounter a delay before their next call is accepted.
For example, if a user receives an error response within three seconds into the 60-second window, followed by 49 more mistakes within the next 30 seconds, they will need to wait for 27 seconds before they can make another call. The system resets the timer for the next call once the time window after the last incorrect attempt has passed.
The endpoints specified below imposes a rate limit on all requests regardless of response codes.
POST /v1/search/actions - 100 per minute and 30 per 10 seconds are allowed.
GET /v1/invoice/action/{id} - 600 per minute and 100 per 10 seconds are allowed.
GET /v1/invoice/actionbyinvoicenumber/{id}?invoiceNumber={invoiceNumber} - 600 per minute and 100 per 10 seconds are allowed.
The Billecta API will return HTTP 429 if the limit is reached.
XSD
You may automatically generate code and models based on our XSD.
For .NET (Core or Framework) applications you may want to use our SDK instead.
Concepts
You may want to familiarize with some of our concepts in order to get a full understanding and to know how models in your application map to models in the Billecta API.
Domains
All users are part of a 'domain'. Within a domain you can have multiple users and most important multiple companies (called creditors in the API). A company is
the legal entity that for instance sends the invoices and receive payments from their customers (called debtors in the API). Users with the same domain can have
read/write/attest/etc rights on each creditor.
Companies/Creditors
In the Billecta services, a company is referred to as a 'creditor'. A company/creditor is the legal entity (not private person) that you as an API integrator
perform operations on. Almost all requests of the API require that you specify which creditor the request is made for. That is because one user can handle
multiple creditors, and data can't be shared between creditors. Each creditor has their own set of debtors, products, cost centers etc that may not be shared
between creditors. For instance, creating a product, we need to know which of the creditors in the domain this should be added to. Another example is when making BankID
authentications, since the BankID certificate is a contract between the Bank and the company/creditor.
Customers/Debtors
The customers of a creditor are referred to as 'debtors'. Debtors are the entities that receive the invoices and the one paying to the creditor. A debtor can be an
individual or a company. In the API the property OrgNo is used regardless whether it is a personal number (social security number) or an organizational number.
Invoices
Billecta has four different invoice types. This table lists the differences between the types.
A reconciliation invoice is a subset of an invoice. It requires much less data to be sent to the API and is a faster and slimmer invoice. If an invoice PDF is
attached to the invoice distribution (through for instance email, mail, e-invoice, etc) is possible. If no PDF is attached, only reconciliation on incoming
payment are made. The loss when using reconciliation invoice is that no bookkeeping can be made since the data sent to the API is not complete. The advantage
however is a faster and easier integration and features like swish, credit card payments and autogiro withdrawals are supported just like an ordinary invoice.
A verification invoice is a pure bookkeeping event. You create the verification to write to the bookkeeping and have a 'receipt' on the invoice for tracking.
Invoice stages
An invoice can be in one of the following stages (InvoiceActionStageType)
Created - Created as draft. The only stage in which an invoice is removable
Attested - Attested/Approved and bookkept. Invoice is from now on not removable.
InvoiceSent - Invoice has been sent using the preferred delivery method.
ReminderInvoiceSent - Invoice has due and a reminder invoice has been sent.
SentToDebtCollection - Invoice has due and has been sent to debt collection.
SalesRequested - The invoice is sent to financier for sales (no response received yet)
SalesRequestedDenied - The invoice sale request was denied
Sold - The invoice sale request was approved and invoice is sold
SalesRequestedCancelled - The invoice sale request was approved and then the purchase was cancelled by financier
Completed - Invoice has been paid/credited and closed. No more actions can be taken on invoice.
Verification invoice stages
An invoice can be in on one of the following stages (InvoiceActionStageType)
Created - Created as draft. The only stage an invoice is removable.
Attested - Attested/Approved and bookkept. Invoice is from now on not removable.
Completed - Invoice has been paid/credited and closed. No more actions can be taken on invoice.
Reconciliation invoice stages
An invoice can be in on one of the following stages (ReconciliationInvoiceActionStageType)
InvoiceSent - Invoice has been created and marked as sent.
SentToDebtCollection - Invoice has due and has been sent to debt collection.
Completed - Invoice has been paid/credited and closed. No more actions can be taken on invoice.
Self invoices
Self invoices are supplier invoices that you create for your supplier to yourself. That is, you are invoicing yourself on behalf of your supplier. Self invoices
are widely used when invoice for your customer on their behalf (where payment is made to your account) to their customer. To automatize the payment flow you need
to further promote the payment from your account to your customer. In a sense a supplier invoice to you that you create yourself.
Self invoice stages
A self invoice can be in on one of the following stages (SelfInvoiceActionStageType)
Created - Created as draft. The only stage a self invoice is removable.
Attested - Attested/Approved and bookkept. Invoice is from now on not removable.
InvoiceSent - Invoice has been sent using the preferred delivery method.
PaymentSent - Payment has been sent. Successful payment status from payment system (Bank) has not yet been received.
PaymentCancelled - Payment was cancelled either by user or bank.
Completed - Payment was successfully made. No more actions can be taken on self invoice.
Cancelled - Self invoice has been cancelled and fully credited. No more actions can be taken on self invoice.
Amounts
Amounts in the Billecta API are handled by the Amount/AmountView models. The class contains a Value and a CurrencyCode property. The value is specified in cents for that currency and is of data type long. For instance, a value of 500.34 SEK should be specified as 50034 in the Value property since SEK currency has 2 cent digits.
The first two numbers (from the right are the decimals/cents. The number of decimals can differ from currency to currency. A call to the Currency API will return a
list of all currencies and for each currency information on how many numbers in the value that should be decimals.
Ignore ValueForView
ValueForView in the Amount/AmountView structure shall be omitted when calling the API. It is a read only value.
Files
Getting PDFs, ZIPs or other files from Billecta API always returns a FileView object. The FileView object is a reference to a file with meta data. For performance reasons,
the file contents are never returned in the property FileView.Data. To download the actual contents a separate call must be made. Please view
GET FILE CONTENT/STREAM in the File API for more information.
Basics
Requests & responses
The Billecta API supports both XML and JSON data formations for both request and response calls.
By sending application/xml in the Accept header the Billecta API will return XML formatted text.
By sending application/xml in the Content-Type header the Billecta API interpret request data as XML.
Same applies for JSON. Sending application/json will interpret requests as JSON and write responses in JSON.
The API responses may have the following HTTP response codes
200 - Everything has passed OK.
400 - Something went wrong. Please refer to the error message in the Header or Response content stream
401 - You are unauthorized to the requested data or the API. Verify that you have specified the correct CreditorPublicId, DebtorPublicId, etc, or contact support@billecta.com if everything looks fine in the data.
500 - Some other internal error. Please contact support@billecta.com.
Default value
The default value is XML if no header is specified, however, JSON is advised.
Transactional calls
Internet connections are not always stable. Occasions might occur that a successful HTTP 200 response from Billecta API to your system might be interrupted somewhere in the line between Billecta API
and your system. In that case your application will assume that the call was never processed and redo the request. In those scenarios duplicate data will be inserted into Billecta API. To handle this, we
have a method of handling unique calls.
To ensure unique API requests without duplicate calls, requests to Billecta API can include a request header named 'UniqueApiCallId'. The header value should be of type string and contain between one
and fifty characters. The UniqueApiCallId value will be kept in the Billecta for three months before new calls can be made with old UniqueApiCallId values. Requests made to Billecta API with UniqueApiCallId
containing a duplicate or invalid value will not be processed and a response with status code 403 (Forbidden) including a status description will be returned.
The UniqueApiCallId can be hash or similar that is calculated in your application and passed in request to Billecta API.
UniqueApiCallId is optional
Note that the UniqueApiCallId is optional. It can also be used in only a subset of calls. For instance payment registrations that you might want higher transactional security on.
Errors
All data passed to the Billecta API is validated and upon errors the following codes will be returned
400 - Data is wrong
401 - You are unauthorized to the requested data or the API. Verify that you have specified the correct CreditorPublicId, DebtorPublicId, etc, or contact support@billecta.com if everything looks fine in the data.
500 - Some other internal error. Verify that Json/XML is parsable and that Enums are correctly spelled. Please contact support@billecta.com in other cases.
401
When requesting data without specifying the correct id:s the API will regardless of if the referenced data exist or not respond with access denied. For instance, when creating a debtor
and no creditor is specified (it will be interpreted as an empty GUID) the api will respond access denied even though the id reference was empty.
400
Data sent to the Billecta API is always validated against rules and regulations for the expected type of data. For instance, when saving a debtor and setting EInvoiceBank to a non-empty value the organization/person number must be specified.
A validation is made in that case and if no organization/person number is specified the API will respond with a 400 error code. To view the error message, you can either read the error message in the header "ErrorMessage" or read the
response body content (either Json or XML depending on the "Accept" header value. The error message in the header is encoded in ISO-8859-1 while the content stream is in UTF-8.
Localized errors
Note that errors in the test environment can be localized to English instead of standard language Swedish. To change to English, sign in to the portal in test environment and change the language of the API user.
Authentication
All communications between your system and Billecta is secured and encrypted with SSL. Authentication towards Billecta API can be done in two ways:
Basic Authentication with a username and password
SecureToken - equal to so called API-key
The methods are described below
Basic Authentication
In order to authenticate a call with Basic Authentication you use the Authorization header. The header should be created accordingly:
Username and password is combined into a string "username:password"
The string should be coded in Base64
The authentication method Basic a space should be preceding the coded string
For example, if the user has "Alladin" as a username and "Sesame, open" as a password, the header should have the following structure:
Authorization: Basic QWxsYWRpbjpTZXNhbWUsIG9wZW4=
You can use Basic authentication in all calls to the Billecta API.
An alternative way where you don't need to use your username and password, is to generate a SecureToken and use it in communication to the Billecta API. To create a SecureToken you need to logon a first time
using your username and password, and create a SecureToken. A SecureToken is valid until a new one is generated. When a new SecureToken is created, the old one is revoked and can not be used when authenticating
towards the Billecta API. To generate a new SecureToken you make a Basic authentication request with username and password to:
/v1/authentication/apiauthenticate
You find more information about this call in the API reference, see the Authentication section
To authenticate with SecureToken you use the Authorization header. The header should be created accordingly:
Encode the SecureToken in Base64
The authentication method, SecureToken and a space is preceded by the encoded SecureToken
For example if the request to generate a SecureToken returned: 5Uis54EmQ/9jJtGhQoS8K9xHRsMXQhZg== the requests to the Billecta API should contain the following header
Note that if the SecureToken is changed, the user will receive an email regarding the updated SecureToken as a security measure.
Webhooks
Webhooks can be used for subscribing to a range of events in the Billecta system. When an event is triggered in the Billecta system a POST request to your predefined URL is made. POST data is located in the request
content stream. Creating event webhooks is made in the Billecta Portal and requires that you are an administrator when setting up. It is located under settings, then click on the integration tab. Note that the event
webhook settings are applied on all your creditors. If the post request from Billecta fails, Billecta will retry 4 times with the interval of:
5 minutes for the first retry
60 minutes for second
3 hours for third
24 hours for the last retry
If the request still fails after 5 tries, an email is sent to the administrator users with the post data included as a json-file.
Data posted in the webhook request
The property 'Data' will contain different types of data depending on the event type. Here is an example.
The property 'AdditionalData' will contain different types of data, if it has data, depending on the event type. In most events it will not be included.
Events
Event description
Event type
Data type
Additional Data type
Invoice created
InvoiceActionCreated
InvoiceActionView
[Nothing]
Invoice updated
InvoiceActionUpdated
InvoiceActionView
[Nothing]
Invoice deleted
InvoiceActionDeleted
string (ActionPublicId)
string (DebtorPublicId)
Invoice fully paid
InvoiceActionPaid
InvoiceActionView
[Nothing]
Invoice sale accepted
InvoiceSaleWasAccepted
InvoiceActionView
[Nothing]
Invoice sale denied
InvoiceSaleWasDenied
InvoiceActionView
[Nothing]
Invoice state has changed
InvoiceActionStateChanged
InvoiceActionView
[Nothing]
Invoice has been viewed on 'mypages'
InvoiceActionViewed
InvoiceActionView
[Nothing]
Invoice has been commented
InvoiceCommented
InvoiceActionCommentedView
[Nothing]
Invoice email has been opened
InvoiceActionOpened
InvoiceActionView
[Nothing]
Invoice email or SMS has been received
InvoiceActionReceived
InvoiceActionView
[Nothing]
Invoice attested
InvoiceActionAttested
InvoiceActionView
[Nothing]
Received payment for invoice/reconciliation invoice
InvoicePaymentReceived
IncomingPaymentView
[Nothing]
Amount credited on invoice/reconciliation invoice
AmountCreditedOnInvoice
IncomingPaymentView
[Nothing]
Amount written off on invoice/reconciliation invoice
AmountWrittenOffOnInvoice
IncomingPaymentView
[Nothing]
Reconciliation invoice created
ReconciliationInvoiceActionCreated
ReconciliationInvoiceActionView
[Nothing]
Invoice/Self invoice/Reconciliation invoice/Einvoice email or SMS could not be delivered
UndeliveredInvoice
InvoiceDeliveryStatusView
[Nothing]
Successful self invoice payment
SelfInvoiceOutgoingPaymentSucceeded
OutgoingPaymentStatusView
[Nothing]
Successful supplier invoice payment
SupplierInvoiceOutgoingPaymentSucceeded
OutgoingPaymentStatusView
[Nothing]
Successful payment through the api
OutgoingPaymentSucceeded
OutgoingPaymentStatusView
[Nothing]
Failed self invoice payment
SelfInvoiceOutgoingPaymentFailed
OutgoingPaymentStatusView
[Nothing]
Failed supplier invoice payment
SupplierInvoiceOutgoingPaymentFailed
OutgoingPaymentStatusView
[Nothing]
Failed payment through the api
OutgoingPaymentFailed
OutgoingPaymentStatusView
[Nothing]
Unmatched payment
UnmatchedPayment
UnhandledPaymentView
[Nothing]
Overpayment
Overpayment
UnhandledPaymentView
[Nothing]
Overpayment matched
Overpayment matched to invoice
OverpaymentMatchedView
[Nothing]
Payment has been received to Billecta client funds account
PaymentReceivedToBillectaClientFunds
InvoiceActionView
[Nothing]
Self invoice created
SelfInvoiceActionCreated
SelfInvoiceActionView
[Nothing]
Self invoice updated
SelfInvoiceActionUpdated
SelfInvoiceActionView
[Nothing]
Self invoice attested
SelfInvoiceActionAttested
SelfInvoiceActionView
[Nothing]
Self invoice deleted
SelfInvoiceActionDeleted
string (ActionPublicId)
string (DebtorPublicId)
Self invoice fully paid
SelfInvoiceActionPaid
SelfInvoiceActionView
[Nothing]
Reminder invoice created
ReminderInvoiceActionCreated
ReminderInvoiceActionView
[Nothing]
Reminder invoice sent
ReminderInvoiceActionWasSent
ReminderInvoiceActionView
[Nothing]
Reminder invoice paid
ReminderInvoiceActionPaid
ReminderInvoiceActionView
[Nothing]
Debtor created
DebtorCreated
DebtorView
[Nothing]
Debtor updated
DebtorUpdated
DebtorView
[Nothing]
Debtor deleted
DebtorDeleted
string
[Nothing]
Debtor has requested change of stored customer information
DebtorInformationCorrectionRequested
DebtorInformationCorrectionRequestView
[Nothing]
Unknown e-invoice registration (B2C)
UnknownEInvoiceRegistration
EInvoiceRegistrationView
[Nothing]
Debtor E-Invoice information updated
EInvoiceInfoOnDebtorChanged
DebtorView
[Nothing]
Creditor shared
CreditorShared
WebhookCreditorShareView
[Nothing]
Creditor shared removed
CreditorUnshared
[Nothing]
[Nothing]
Creditor created
CreditorCreated
CreditorView
[Nothing]
Creditor updated
CreditorUpdated
CreditorView
[Nothing]
Creditor deleted
CreditorDeleted
string
[Nothing]
Creditor KYC updated
CreditorKYCUpdated
CreditorKycView
[Nothing]
Autogiro approval failed to register
AutogiroApprovalFailed
DebtorView
AutogiroApprovalCommentCodeView
Autogiro approval has changed (added, changed or deleted)
AutogiroApprovalChanged
DebtorView
AutogiroApprovalCommentCodeView
Autogiro withdrawal failed on invoice
AutogiroWithdrawalFailedOnInvoice
InvoiceActionView
AutogiroWithdrawalCommentCodeView
Autogiro withdrawal failed on reconciliation invoice
AutogiroWithdrawalFailedOnReconciliationInvoice
ReconciliationInvoiceActionView
AutogiroWithdrawalCommentCodeView
Autogiro withdrawal failed but new retry will be made tomorrow on invoice
AutogiroWithdrawalRenewedOnInvoice
InvoiceActionView
[Nothing]
Autogiro withdrawal failed but new retry will be made tomorrow on reconciliation invoice
AutogiroWithdrawalRenewedOnReconciliationInvoice
ReconciliationInvoiceActionView
[Nothing]
Credit card withdrawal failed on invoice
CreditCardWithdrawalFailedOnInvoice
InvoiceActionView
[Nothing]
Credit card withdrawal failed on reconciliation invoice
CreditCardWithdrawalFailedOnReconciliationInvoice
ReconciliationInvoiceActionView
[Nothing]
Credit card withdrawal canceled on invoice
CreditCardWithdrawalCanceledOnInvoice
InvoiceActionView
[Nothing]
Credit card withdrawal canceled on reconciliation invoice
If you are missing a webhook, please send a request to us and we'll add it to the API.
Dates and time zones
The Billecta API server run on Stockholm time zone, ie +01:00 from GMT. All dates passed to Billecta without time zone information are considered as in
Stockholm time. Likewise, all dates returned from Billecta API without any time zone information are in Stockholm time. The API should however always
return dates with time zone information. When using the SDKs this is managed automatically by the SDK library.
Dates must always be specified in ISO 8601. The standard defines dates in the following format
2017-03-15T06:35:06+00:00
2017-03-15T06:35:06+01:00
2017-03-15T06:35:06Z
2017-03-15
Dates in invoice rows
All invoice rows, products and contract invoice rows that has a description property where the description of the sold entity supports programming of dates in each row.
If you want to have, for instance, contract invoices that foreach time a new invoice is created from a certain row should have the current, future or past date certain codes can be put in the invoice rows.
The following codes can be inserted in product descriptions and contract invoice row descriptions (if the current date is 2017-03-07):
Pattern
Example
{YY} or {ÅÅ}
26
Prints out the current year in short
{YYYY} or {ÅÅÅÅ}
2026
Prints out the current year
{MM}, {MMM} resp. {MMMM}
07, Jul resp. July
Prints out the current month as number, short and long formats
{DD}
16
Prints out the current day in the month
All the formats above can have the suffix +/- followed by an integer number. For instance
{YYYY+1Y} prints 2027
{MMM-2M} prints maj
The codes above only print parts of a day (year, month or day). When calculating on complete dates the following formats must be used
Pattern
Example
{YYMMDD} or {ÅÅMMDD}
260716
{YY-MM-DD} or {ÅÅ-MM-DD}
26-07-16
{YYYYMMDD} or {ÅÅÅÅMMDD}
20260716
{YYYY-MM-DD} or {ÅÅÅÅ-MM-DD}
2026-07-16
{MMM YYYY} or {MMM ÅÅÅÅ}
Jul 2026
{MMMM YYYY} or {MMMM ÅÅÅÅ}
July 2026
Also, complete dates have support for suffixes using +/- and an integer number. However complete number must also specify which part of the date is added/decreased. You can select amount
Y for year. For example {YY-MM-DD+1Y} prints 27-07-16
M for month. For example {YY-MM-DD+18M} prints 28-01-16
D for day. For example {YY-MM-DD+30D} prints 26-08-15
D for day, M for month. For example {YY-MM-DD-30D+2M} prints 26-08-17
Certificates
Need Help with Certificates?
Billecta offers to handle the certificate generation and addon configuration if you are unable to do it yourself.
This service is offered at a fixed cost of 5,000 SEK (5 hours at 1,000 SEK/hour).
Please contact for more information.
Test
In production, API features dealing with BankID and Swish require authentic passphrase protected SSL certificates.
However, in the test environment certificates are not used and are merely there to simulate production like requirements.
You may selfsign or use these in our test environment:
This is a GUIDe on how to obtain and activate a production Swish certificate with Billecta.
To manually generate a certificate, you need to create a CSR file and a private key. We recommend OpenSSL. Follow the instructions below to create a CSR file + private key using OpenSSL in Git Bash Portable. If you already have OpenSSL installed, go to step 2.
Important Note
If you have the Swish Payout service, you need to generate two certificates, one for communication and one for signing.
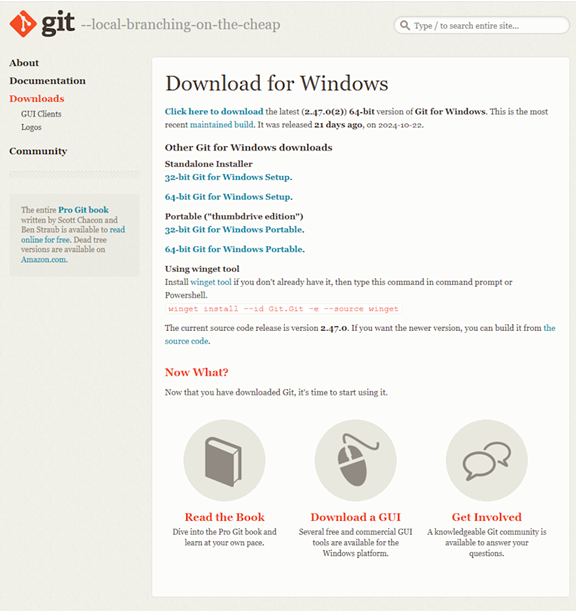
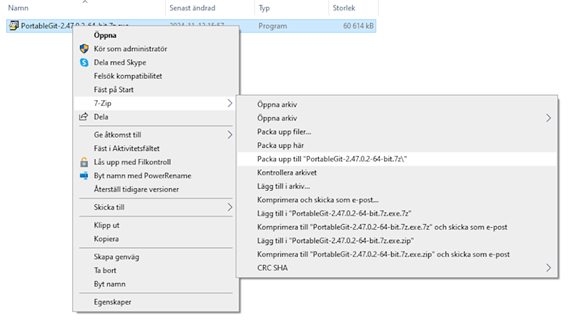
When the download is complete, you will have the following file: PortableGit-2.47.0.2-64-bit.7z.exe. The file name may vary depending on the version of Git and the Windows system architecture. Extract the contents to a folder using 7zip or WinRar.
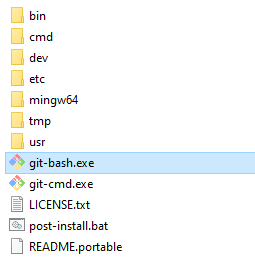
2. Run Git Bash
Inside the folder, run git-bash.exe.
3. Generate Certificate Files
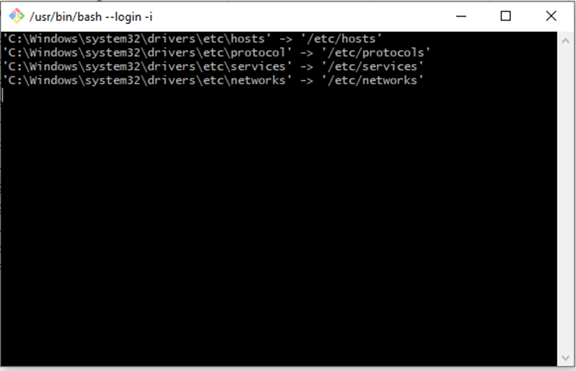
Wait 1-2 minutes until you see "user@hostname MINGW64 /". Copy and paste the following command:
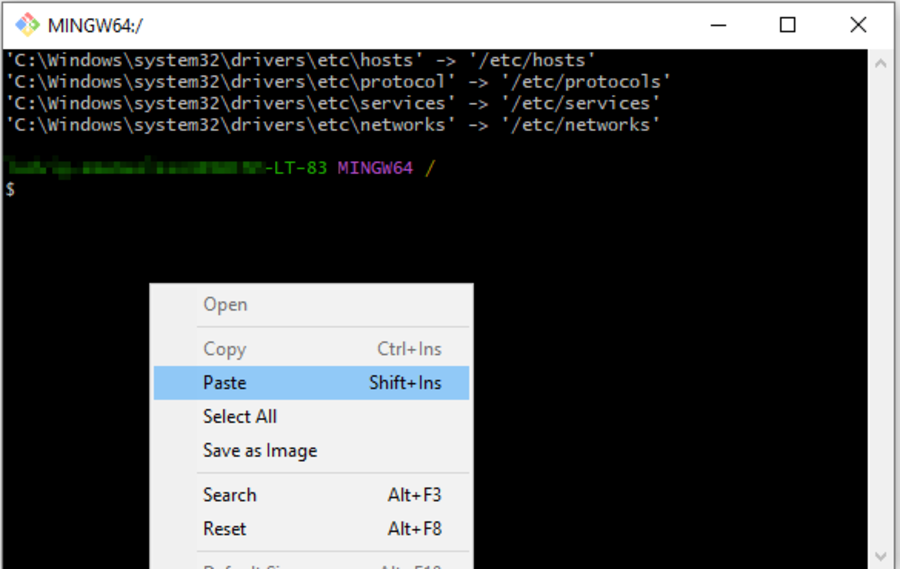
To paste, use "Shift+Ins" or right-click and select "Paste". Press Enter.
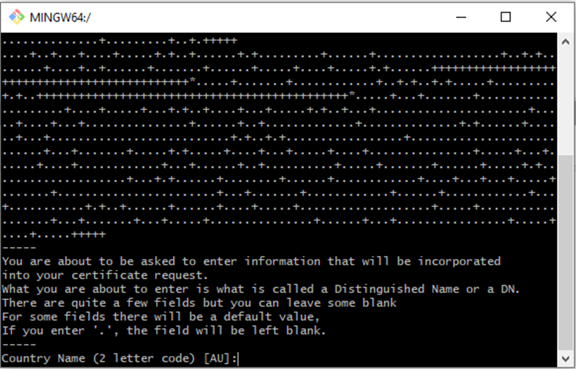
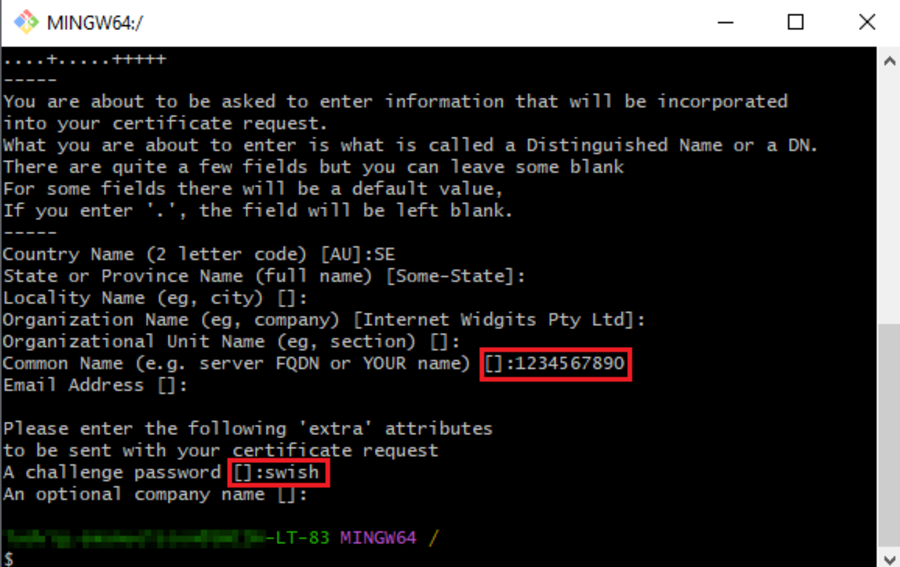
4. Enter Certificate Information
You will now be prompted to enter information about your company and the certificate. All steps are optional EXCEPT Common Name and A challenge password. If you want to skip the other steps, simply press Enter.
Common Name = Your company's 123-number.
A challenge password = Password for your private key. You must save this securely and not share it with anyone.
5. Upload Certificate Files
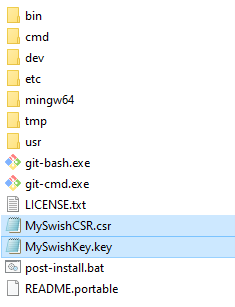
Now, in the same folder as Git Bash Portable, you will have two new files: "MySwishCSR.csr" and "MySwishKey.key".
Upload "MySwishCSR.csr" to the company portal, and you will receive a public key in .pem format. With both the public and private keys, you will be able to use the Swish API.
You need to upload the file to Swish using the instructions in the link below. Once processed you have to convert the Pem file to a PFX file. We have a separate guide for that here.
Upload the certificate file to the Billecta portal
Go to addons.
Click the pencil icon in the Swish addon.
Select your certificate file and enter your previously decided passphrase and your Swish number.
Press Save.
Need Help?
For any questions regarding the Swish certificate, please contact Billecta support.
BankID
This is a GUIDe on how to create and activate a production BankID certificate with Billecta.
This type of BankID certificate is referred to as a "relaying party certificate" or, in Swedish, something like "BankID förlitande part".
Either you do most of the steps in the GUIDe yourself, or Billecta may do it for you.
Prerequisites
You must have signed a BankID agreement with your organization's bank, regardless.
Do it yourself scenario
Backend
Request a certificate
Your certificate is ordered from the bank you have the agreement about our services with. The steps are:
Create the request with BankID Keygen.
Send the request to the bank.
Receive the issued certificate from the bank.
BankID Keygen
To run the BankID Keygen software you need to start a command prompt or terminal application for your operating system (Windows, Mac OS or Linux respectively).
You don’t need to install anything to run this application.
Unpack the downloaded zip file with BankID Keygen in your preferred folder. BankID Keygen requires no installation and can be run from e.g. a USB flash drive.
Create request
If you haven't already done so, start by unpacking the downloaded zip file with BankID Keygen in your preferred folder.
Windows
From the command prompt, navigate to where you saved the BankID Keygen (`keygen-windows.exe`) and start the program.
Enter information
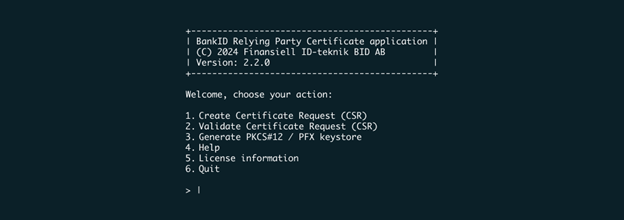
When you start the Keygen program you will see the Keygen welcome screen:
To generate a CSR, select '1' on the welcome screen and press 'Enter'. The following information is required in the CSR process:
Official name of your organisation
This should be your organisation’s registered company name (max 64 characters).
Corporate identity number of your organisation
Enter your company’s corporate registration number according to Bolagsverket or equivalent without hyphens or spaces (10 digits).
Password to protect your private key
This is your password to protect your private key that will be generated. It must be at least 12 characters long and contain four letters and one digit.
You will have to use this password later in the process when creating your PKCS#12.
It's very important that you remember this password as it can't be restored!
Display name
This will be shown to the user when they identify themselves or sign to your services. Enter the name to be displayed (max 40 characters) according to the instructions from your bank.
The display name is usually the organization's registered company name or the name commonly used for the organization /e-service, e.g. a registered trademark.
Before the certificate request is created you will have the option of verifying the information. If all looks good, press Y and enter to create the certificate request.
Private key file
The application will suggest a filename for Private Key file. If you accept it the file will be saved in the working directory.
If you want to save it in another place you can manually type the path and file name. Make sure the file extension is still .key.
Certificate request file
The application will suggest a filename for CSR file. If you accept it, the file will be saved in the working directory.
If you want to save it in another place you can manually type the path and file name. Make sure it's still .p10. This is the file you need to send to the bank in order to get your certificate.
The CSR-generation is finished and you can ensure your request is created and saved on the disc:
Send request
You should now send the certificate request that you have just created (example CSR_Ericsson_20200323.p10) to the bank with which you have signed the agreement on the use of the BankID service.
This shall be done according to the instructions from the bank. You should receive the recipient and delivery information from the bank.
Create the PKCS#12/PFX file
Once you've received the issued certificate from the bank it's time to create a bundle containing the private key and the certificate. This will be used from your application in communication with our service. The bundle is often referred to as a PKCS#12, P12 or PFX file.
Windows
From a command prompt, navigate to where you saved BankID Keygen (keygen.exe) and then run the command keygen.exe.
Start a terminal and navigate to where you saved BankID Keygen and then type './keygen'. This will start the welcome screen of BankID Keygen.
Steps to Generate PKCS#12/PFX
On the welcome screen, select option 3: "Generate PKCS#12 / PFX".
BankID Keygen will display a numbered list of all files with the .key extension in the working directory. Select the number corresponding to the private key you want to use and press "Enter". If there is only one key in the directory, the number will be 1.
Enter the password for the private key when prompted. This is the password you created when you generated the CSR file. Press "Enter".
Select the certificate you received from the bank. If it is saved in the working directory, it will appear in a numbered list; otherwise, you need to enter the file path manually.
Finally, enter the path where you want to save the PKCS#12 file. Press "Enter" to save it in the working directory with the default filename, or manually enter a new filename and pat.
Upload the certificate file to the Billecta portal
Select your certificate file and enter your previous decided passphrase.
Verify (optional)
Wait about one minute before pressing the button to verify your certificate.
if there are any problems, do not hesitate to contact Billecta and we will assist you.
Use cases
This page and the subsections below describe specific workflows and usages of Billecta API features.
Basic invoicing
This section will describe the most basic operation of sending an invoice using the Billecta API, and it's associated bare necessities.
In order to send and invoice, you need to create products which will go onto the records of the invoice. You also need to create debtors, meaning the recipients of invoices.
Debtors are the recipients of invoices, meaning they are the end customers. There is also a plural POST to create several at a time, and a PUT which would update a preexisting entry. Alternatively, you could create the debtors in the portal if you are always invoicing the same small set of customers.
Product go onto the invoice records. If you are selling furniture, a sofa may be a product. As with debtors, there's also a plural POST to create several at a time, and a PUT (create/update). Alternatively, you could also create products in the portal using your web browser - in case you're going to keep re-using the same small set of already defined products.
This will deliver the invoice, provided a means of distribution has been set.
That's it — as the most basic invoicing use case. Certainly creating and attesting an invoice could also be done in the portal, but if you're an API user you should get familiar with these fundamental steps through the API.
If you are on a Microsoft .NET platform, we recommend you to try our SDK, which encapsulates the actual requests described here into methods of our .NET NuGet library.
Account retrieval
Billecta has introduced a new way to retrieve bank account numbers for private individuals. This new method retrieves account details via an iframe, rather than requiring both initiation and status polling.
The new flow is simplified and eliminates the polling process entirely, ensuring that the session status is always set when retrieving the consumption report. The image to the right illustrates the new flow, which proceeds as follows:
The user initiates the process by calling the Billecta API. The user can initiate the iframe for a specific creditor. Read more about the initiation here.
Billecta creates and returns two values, a SessionToken and SessionId. On successful calls, the creditor is charged based on their price list – which can be found in the Billecta portal under creditor settings. See the "Price list" tab.
The user inserts the two properties into our javascript client. Read more about the client here.
Once the client is created and started, it creates the actual iframe – which the debtor can authenticate via their individual bank and choose which account they would like to use.
Depending on the session outcome, the iframe will post a message to the parent page with either an account number or an error.
Please note that no personal information, except the optional passing of personal id number, is passed through this flow. The debtor authenticates directly with their bank, and we never save the debtor's personal information passed via the iframe. It is therefore up to you (the user) to decide if and how to store this information. It cannot be collected from Billecta after the session is complete.
The only information that can be collected once the session is complete is a report on successful/failed sessions, which can be retrieved in the Billecta portal.
😍
How to initiate account retrieval
Test Environment Information
Please use the following personal identity number to retrieve account details within the test environment: 740121-0674.
You can use any six digit number if you choose not to pass any personal identity number in the body and instead choose the test bank manually in the iframe.
To initiate the account retrieval process, make a POST request to the following endpoint:
POST /v1/bankAccount/InitiateRetrieval
{
    "CreditorPublicId":"467fe7dd-529b-47cc-bc63-d840981a52aa",
    "PersonalIdNumber":"yyMMdd-xxxx" // optional
}
The response body is a JSON object that contains two properties SessionToken and SessionId. Both of these are meant to be put in the javascript client.
How to use the Billecta client
The parameters returned by the Billecta's API is meant for our provided javascript client. You are free to change the size however you like, but the recommended and default size is 400x600 pixels.
The javascript is collected from <script src="https://accountlookup.billecta.com/js/client.js"></script>.
The client, meant for the end-user, is instantiated by calling var client = new Billecta(sessionToken, sessionId);. The input parameters are the sessionToken and sessionId that was returned upon successful initiating call in the first step.
Remarks:
When starting the client you also specify how you'd like to handle the three different states.
The selector parameter is a CSS selector that points to the iframe element in your HTML where the account retrieval process will be rendered.
If you'd like to test the implementation in our test environment you need to instantiate the client with a different baseUrl:
const client = new Billecta(sessionToken, sessionId, {
    baseUrl: 'https://accountlookup.test.billecta.com'
});
You can simply start the instantiated client with the following code snippet.
client.start({
    selector: "#bank-account-iframe",
    onSuccessful: (data) => {
        console.log('Success!', data);
        // data contains: { sessionState, clearingNo, accountNo, bank, bankName }
        // Handle success
    },
    // Listen for ABORT (User cancelled or closed)
    onAborted: (data) => {
        console.log('Aborted by user', data);
        // data contains: { sessionState, errorMessage }
        // Handle aborted
    },
    // Listen for FAILURE (Technical error)
    onFailed: (data) => {
        console.error('Process failed', data);
        // data contains: { sessionState, errorMessage }
        // Handle failure
    },
    // optional fields
    width: '400px', // 400px is default. Max value 559px. Exceeding will use default values
    height: '600px', // 600px is default.
    colorTheme: 'light' // or "dark". Default is light.
});
If you'd like to manually close the client you can simply call client.stop(). This will result in aborted state and the error message is "Manually stopped".
Also note that the client will clean itself, you don't need to manually call the client.stop() when you have handled the three different states.
BankID authentication/sign
Authentication and sign with mobile BankID are supported as a standalone feature in Billecta API. Detailed information about
each call can be found at API reference. By specifying a Swedish person number (12 digits)
you can trigger an authentication or sign in your users mobile phones. This can be used for various purposes in your application.
Prerequisites to use the mobile BankID features are
A creditor exist in Billecta Portal
A mobile BankID certificate has been issued by your bank and uploaded in the Billecta Portal (see instructions)
A mobile BankID certificate must be issued by your bank. Please contact your bank if you don't have one already.
Once you have the mobile BankID certificate, convert it to .pfx certificate with a password (required for security reason) and upload it in Billecta. Sign in to Billecta Portal, open settings and press on Addons. Press on Add Addon and select Mobile BankID. Upload your certificate with your password and press save.
The flow for mobile authentication
The sign process is similar, but to a different endpoint.
User mobile/browser
Your system
Billecta API
1. Start by making a request to Create Mobile BankID authentication/sign request in Billecta API (see API reference).
2. Billecta API initiates a mobile BankID authentication with the bank and returns a BankIdAuthenticationStatusView containing a ReferenceToken.
4.1 User open app and authenticates him/her self.
3. Your system receives the BankIdAuthenticationStatusView to the initiated requests and inform the customer to open their mobile BankID app (or automatically open their mobile BankID app). Information on how to open BankID app on cell phone is covered in the following link.
4.2 While user authenticates them self your application polls the Billecta API (each second is sufficient) by making a request to Get Mobile BankID authentication status in Billecta API. Use the ReferenceToken received when initiating the mobile BankID authentication.
4.3 Billecta API checks status of user authentication.
If authenticated: The response will be a BankIdAuthenticationStatusView with status Complete.
If not authenticated yet (might take some time): The response will be a BankIdAuthenticationStatusView with status Started or OutstandingTransaction. Poll again according to 4.2 after 1 second.
If aborted or other error: The response will be a BankIdAuthenticationStatusView with status NoClient or Error.
7. User is authenticated or has signed.
6. When receiving BankIdAuthenticationStatusView a response with status Complete, present to the user that they are authenticated.
This means that you first initiate an 'authenticate job' that will get the process going in the background. Then we wait for the users (can take some time). Meanwhile you continuously check the status if the
customer has authenticated themselves and if the 'authenticate job' is completed. Once the 'authenticate job' you will get all data collected (IP-number, etc).
Note that the information is only stored at most 24 hours before the collected data is removed in accordance to GDPR.
Kivra
Kivra Setup
To get started, go to Addons under Settings in the app and enable the Kivra addon. Once Kivra has been enabled, the only remaining task is to update the delivery method for your debtor or select Kivra as the delivery method when creating an invoice through our API. After completing these steps, you're good to go.
Please note that, to send content through Kivra, the following requirements must be fulfilled:
The debtor must have an active account with Kivra.
The debtor must have a Swedish SSN.
The debtor must not have opted out of receiving content from your company.
In our test environment, you can test your Kivra connection. The setup is identical to production. However, to add a user to Kivra in test, you can do any of the following:
Contact us, and we will provide you with an SSN that is active in Kivra's Sandbox environment.
Payments with Swish
To get started with allowing payments with Swish within your application the following configuration must be made and flow implemented. By integrating Swish in Billecta API
invoices will be automatically processed as paid and bookkept once payment is completed. Swish requires that a Swish certificate is issued by Swish (https://www.getswish.se/).
Instructions on how to retrieve a Swish certificate can be read at https://developer.getswish.se/. Please note that you are applying for 'Swish for Merchants'. Also contact your
Bank to activate required bank services and more information on how to get started.
Prerequisites to use the Swish features are
A creditor exist in Billecta Portal
A Swish certificate has been issued and uploaded in the Billecta Portal (see instructions)
The flow for Swish payments
User mobile/browser
Your system
Billecta API
2. Present the Swish payment form for the user where they should have the possibility to specify their registered phone number for Swish payments.
1. Start by creating an invoice or retrieve the action public id of an existing invoice.
3. User enters phone number and presses 'Pay' (or other button to initiate the payment flow)
4. Your system makes a request to Create Swish payment request in Billecta API (see API reference) with the ActionPublicId and the users phone number.
5. Billecta API initiates a swish payment at Swish and returns a token/public id that identifies the initiated payment.
7.1. User opens the Swish app. The app is prepopulated with your company name and amount to pay.
6.1. Your system receives the token/public to the initiated request and inform the customer to open their Swish app (or automatically open it if user is on a cell phone).
7.2. User approves the payment. If user is on cell phone he/she switches app back to your website and waits for updated status.
6.2. While user approves the payment your application polls Billecta API (each second is sufficient) by making a request to Get Swish payment status in Billecta API. Use the token/public id received when initiating the swish payment.
Your system receives the SwishPaymentStatusView to the payment request. If status is 'Created' then keep polling. All other states move down to step 8.
6.3. Billecta contacts Swish and checks status on payment request and returns a SwishPaymentStatusView.
9. Information about the payment status is shown
8. Payment has at this stage either been paid or cancelled depending on the status. If paid, the invoice is marked as paid and payment is registered automatically in Billecta API.
If cancelled then no payment has been made. User is informed about the payment status.
This means that you first initiate a 'payment job' that will get the process going in the background. Then we wait for the user to approve the payment in their app (can take some time).
Meanwhile you continuously check the status if the payment and if the 'payment job' is completed. Once the 'payment job' is completed then show the user the result.
Payments with Credit Cards
This documentation explains two scenarios for credit card payments using the Billecta API: Scenario 1, where the card is saved for future use, and Scenario 2, where the card is used for a one-time payment without saving.
Prerequisites to use the credit card payment features are:
A debtor exist in the Billecta system with an associated public ID
The credit card addon has been activated on the creditor in the Billecta portal
Scenario 1: Payments with Saved Credit Cards
User mobile/browser
Your system
Billecta API
2. The user is presented with an option to save their card information for future payments.
1. Create an intent to add a credit card using the debtor's public ID.
3. The user is redirected to or presented with the AddWindowUrl to input their card details.
4. Your system makes a request to Create intent to add credit card in the Billecta API with the debtor's public ID, SuccessUrl, and FailureUrl.
5. Billecta API securely handles the card information through the AddWindowUrl. Upon success, it returns a public ID for the saved card.
7.1. User completes card information entry and confirms.
6.1. Your system monitors the status of the card-saving process through the returned public ID.
7.2. User is informed of the result (success or failure).
6.2. If successful, your system creates a payment intent for the invoice using the saved card ID.
6.3. Billecta API processes the payment and updates the invoice status to paid.
9. Information about the payment status is shown to the user.
8. Payment has either been successfully completed or failed. The system informs the user of the result.
This flow involves saving a credit card securely for future payments. The process includes adding the card, confirming the action, and then initiating a payment against the saved card.
Scenario 2: Payments Without Saving Credit Cards
User mobile/browser
Your system
Billecta API
2. The user selects an invoice to pay with a credit card.
1. Start by creating an invoice or retrieving the ActionPublicId of an existing invoice.
3. The user inputs credit card details and confirms the payment.
4. Your system makes a request to Create credit card payment intent in the Billecta API with the ActionPublicId, SuccessUrl, and FailureUrl.
5. Billecta API securely handles the payment information and initiates the payment process. A PaymentPublicId is returned.
7.1. User is notified of payment completion and the result.
6.1. Your system polls the API to check the payment status using the PaymentPublicId.
9. User views the payment result (success or failure).
8. Payment is finalized. If successful, the invoice is marked as paid in the Billecta API.
This flow is designed for one-time payments without saving the credit card.
E-invoice intermediators
The intermediator is the VAN carrier that your customers use to receive e-invoices. Intermediator is used for B2B.
These are the intermediators that exist in the system
Enum name
Description
ITELLA
OpusCapita
TIETOSE
Tieto
LOGICA
CGI
PROCEEDO
Visma Proceedo AB
HUSERA
Palette
BASWARE
Basware
EDB
Evry
STRALFORS1
Strålfors Svenska AB
LIAISON_FI
Liaison Technologies
EXPERT
Readsoft/Lexmark
ESSESESS
SEB
HANDSESS
Handelsbanken
DABASESS
Danske bank
SWEDSESS
Swedbank
NDEASESS
Nordea
INEXCHANGE
InExchange
SCANCLOUD
Scancloud
PAGERO
Pagero
CREDIFLOW
Crediflow
PEPPOL
PEPPOL
COMPELLO
Compello
LOGIQ
Logiq AS
APIX
Apix Messaging AB
AKSESSPUNKT
Aksesspunkt Norge AS
FININVOICE
Finvoice
E-invoice banks
The bank type is the receiving bank for e-invoices. Bank type is used for B2C and B2B.
These are the banks that exist in the system
Enum name
Description
OEB
Danske Bank
SEB
SEB
SHB
Handelsbanken
SKB
SkandiaBanken
FSPA
Swedbank och övriga Sparbanker
NB
Nordea
LFB
Länsförsäkringar
FINN
Sparbanken Finn
ICA
ICA Banken
SYD
Sparbanken Syd
DNB
DnB Nor
SBF
Swedbank (företag)
AAB
Ålandsbanken
DBF
Danske Bank (företag)
SEBF
SEB (företag)
SHBF
Handelsbanken (företag)
NBF
Nordea (företag)
FRX
Forex Bank
MARG
Marginalen Bank
Donor organizations with Autogiro
This is an implementation GUIDe for donor a organization (sv: givarorganisation) basic setup with Autogiro.
In order to send an invoice, you need to create products which will go onto the records of the invoice. You also need to create debtors, meaning the recipients of invoices.
Create a product
One single product needs to be created in Billecta, to be used further on in all billing. Manually create the product in the portal. It is also possible to create products using the API if needed.
Collect donor information
Use a web form or equivalent to get the donor’s personal number, period (monthly, quarterly, yearly) and the recurring amount.
Collect an Autogiro approval
If there is no preexisting Autogiro approval for the donor, present the donor with information that they are asked to confirm a bank account for Autogiro withdrawals from your organization. Please see our GUIDe for bank account lookups.
As this involves a BankId signing, this is regarded as a proper approval, provided you are giving clear information to the donor. Save the bank account and use it later when creating a contract invoice.
When creating a debtor, the DebtorView model is populated with Autogiro approval information along with all the other information on the person.
Create a contract invoice
A contract invoice is a container for recurring billing. In this API call, set AutogiroWithdrawalEnabled in the ContractInvoiceActionView, reference the debtor by DebtorPublicId, among other things.

.svg?v=PKjtxaJKu8N4KuGPuTG5N1GY-DwGJKAUF-ZmVaZuumc)